Creating a payment receipt is simpler than you might think. At its core, you just need to tell the story of the transaction: who was involved, what was sold, when it happened, and how it was paid for. It’s a simple, one-page record that provides clear proof of purchase for both you and your client.
The Anatomy of a Professional Payment Receipt
Before you jump into making a receipt, it’s worth understanding what makes a good one. A professional receipt is more than just a confirmation of a sale; it's a critical legal and financial document. It builds trust, ensures you get your books right, and makes tax time a whole lot easier. Every piece of information on it serves a purpose.

Core Identifying Information
First things first, every receipt needs to clearly state who was part of the deal. This is the non-negotiable foundation of the document and gives immediate context to anyone who looks at it, whether that's your client, your accountant, or the IRS.
Here’s the basic contact info you absolutely must include:
- Your Business Details: Your business name, logo, address, and a way to get in touch (phone or email).
- Customer Information: The full name of the person or company that paid you. For B2B transactions, including their address is a smart move.
- Unique Receipt Number: This is your secret weapon for tracking. A simple sequential system (like #001, #002, #003) is perfect. It prevents duplicates and makes finding a specific transaction a breeze.
- Transaction Date: The exact date the payment cleared.
The Financial Breakdown
Once you've established who's who, it's time to get into the numbers. This is where you answer the most important questions: What did they pay for? How much did it cost? How did they pay? This section requires absolute clarity to avoid any confusion down the line.
Many of the details here are similar to what you'd find in professional invoice templates, as both documents need to provide a clear financial trail.
The best way to do this is with an itemized list. It breaks down the total cost into individual line items, offering the kind of transparency that heads off disputes before they can even start. If you want to dive deeper into this, check out our guide on the itemized receipt at https://www.receiptgen.com/blog/itemized-receipt-template.
A well-structured receipt doesn't just show a total; it tells the story of the transaction. Ambiguity is the enemy of good bookkeeping, and a detailed, itemized list is your best tool for achieving clarity and protecting your business.
Each line item should show the price per unit, the quantity, and a subtotal. After listing everything, clearly state the subtotal for all goods/services, add any taxes (like VAT or sales tax), subtract any discounts, and present the final grand total. And don't forget to specify the payment method—cash, credit card, bank transfer, PayPal, etc.
To make this crystal clear, here’s a quick-reference table of everything your receipt needs.
Essential Elements of a Payment Receipt
| Element | Description | Why It's Important |
|---|---|---|
| Business Details | Your company name, logo, address, and contact info. | Establishes your identity and professionalism. |
| Customer Details | The paying customer's full name and/or business name. | Clearly identifies the other party in the transaction. |
| Receipt Number | A unique, sequential number for each receipt. | Essential for internal tracking, auditing, and bookkeeping. |
| Date of Payment | The exact date the payment was received. | Records when the transaction was officially completed. |
| Itemized List | A detailed list of each product/service with quantity and price. | Provides transparency and prevents payment disputes. |
| Subtotal | The total cost before taxes and discounts. | Shows the base cost of goods or services. |
| Taxes/Discounts | Any applicable taxes or discounts applied to the subtotal. | Ensures accurate financial records for tax reporting. |
| Grand Total | The final amount paid by the customer. | This is the most critical number on the receipt. |
| Payment Method | How the customer paid (cash, credit card, transfer, etc.). | Helps with bank reconciliation and financial tracking. |
Nailing these components turns a simple piece of paper into a powerful tool for your business, keeping your records clean and your customers happy.
Gathering Your Business and Transaction Details
Before you even think about templates or receipt-making tools, the real work begins with gathering the right information. I like to think of it like prepping ingredients before you start cooking; having everything organized and ready to go makes the whole process smoother and virtually error-proof.

First up, let's get your own business vitals in order. This information is your professional handshake on paper, telling the customer exactly who they're dealing with.
Here’s the core info you’ll need for every receipt you issue:
- Official Business Name: Use the full, legal name of your company.
- Business Logo: Have a high-quality version ready for digital receipts.
- Physical Address: Your storefront or official mailing address.
- Contact Details: A business phone number and email are must-haves.
This block of information rarely changes, so think of it as the letterhead for all your future receipts.
Capturing the Transaction Specifics
Once you've got your own details down, it's time to capture the unique information for this specific sale. This is where you need to be precise. These details are the heart of the receipt, justifying the total amount paid. A single missing item can cause confusion down the line.
For every single transaction, you absolutely need:
- Customer's Full Name: And their company name if it's a B2B sale.
- Itemized List of Goods/Services: Be descriptive. What did they actually buy?
- Quantities and Unit Prices: How many of each item and what was the price for one?
- Date of Transaction: The exact day the money changed hands.
A simple pro-tip: Keep a small checklist or a note open on your phone during the sale. Jotting down the details in the moment saves you a ton of guesswork later. This one habit is the secret to making receipts effortlessly.
Finalizing the Financials
Okay, now for the numbers. This part is more than just simple addition. You need to correctly calculate and apply any taxes or discounts, and then clearly state how the customer paid. Getting this right is critical for creating a receipt that’s both compliant and easy to understand.
Make sure you have a handle on these financial details:
- Applicable Taxes: Sales tax, VAT, or any other local taxes need to be calculated and shown as a separate line item. Tax rules can be tricky, so it pays to stay current.
- Discounts or Promotions: If you gave them a deal, show it! Clearly subtract any discounts from the subtotal so they see the value.
- Payment Method: Was it cash, credit card, bank transfer, or a digital wallet like PayPal? This detail is invaluable when you’re trying to reconcile your books.
Picking the Right Tool for the Job
Okay, so you've got all the transaction details lined up. Now for the big question: how are you actually going to create the receipt? You’ve got a few options, and the best one really comes down to your sales volume, how comfortable you are with tech, and the kind of professional vibe you want to give your customers.
Let's walk through the main choices so you can figure out what makes sense for you.
Old School: The Manual, Handwritten Receipt
For years, the go-to for small transactions was a simple receipt book. You've seen them everywhere—from the local mechanic to the vendor at a farmers market. A carbon-copy receipt book is fast in a pinch, needs zero electricity, and gives both you and the customer an immediate physical copy.
But let's be honest, this method has some serious drawbacks. It’s slow to fill out, a breeding ground for handwriting goofs and math errors, and it doesn't exactly scream "professional." In a world where most clients expect an email with a PDF, a handwritten slip can feel a bit dated, maybe even a little less trustworthy.
A Step Up: Using Digital Templates
Moving up the ladder, we have pre-made templates in programs like Microsoft Word or Google Sheets. This approach gives you a much cleaner, more consistent look. You can set up a master template with your logo and business info, then just plug in the specifics for each new sale.
It's definitely an improvement over a scribbled note, but you're still stuck with manual data entry for every single receipt. That means the potential for typos and other mistakes is always there. Plus, you’re now the file manager, and that can get messy fast as your business picks up. It’s a solid middle-of-the-road solution, but it can easily turn into a time-sucking administrative headache.
Every minute you spend manually creating a receipt is a minute you aren't spending on growing your business. The goal is to find a method that is not just functional but efficient, professional, and scalable.
The Modern Approach: Dedicated Receipt Software
This is where tools like ReceiptGen completely change the game. Specialized software takes the entire process and puts it on autopilot. It saves your business details, calculates taxes and totals for you, and keeps everything organized. All you have to do is pick a template, pop in the transaction details, and let the software handle the heavy lifting.
This approach practically eliminates human error and cranks out a perfectly professional document every single time. It's no wonder the digital receipts market is expected to balloon to USD 9.145 billion by 2035. For someone using a tool like ReceiptGen, this means getting access to industry-specific templates—like for a restaurant—where adding a logo, tax, and payment method takes just a few seconds.
Here's a crucial point: studies have shown that errors on manual receipts can cost a business anywhere from $10-20 per transaction. That's a cost you can completely sidestep with the right tool. You can dive deeper into this trend and what it means for businesses by reading the full research on the digital receipts market.
Switching to a dedicated receipt generator really pays off. Here’s why:
- It’s Fast: You can create and send a polished PDF receipt in less than a minute.
- It’s Accurate: Say goodbye to math mistakes. Calculations for totals, taxes, and discounts are all done for you.
- It Looks Professional: Sleek, branded receipts don't just look good; they build client trust and make your brand look solid.
- It Keeps You Organized: Most tools automatically create a digital paper trail of all your receipts, making bookkeeping way less painful.
At the end of the day, while manual methods and templates can get the job done for a tiny operation, dedicated software is the undisputed champion for any business that cares about being efficient, accurate, and professional.
Let’s Make a Receipt in Under a Minute
Okay, theory is great, but let’s get practical. Knowing what goes into a good receipt is half the battle. The other half is actually making one without pulling your hair out. I'll show you how to use a simple tool like ReceiptGen to knock out a professional receipt in less time than it takes to make a cup of coffee.
For any small business owner, consultant, or freelancer, speed and accuracy are everything. You don't have time to mess with formatting or double-check your math. This is where a generator comes in.
First, Pick a Look and Add Your Brand
Right off the bat, you'll see a bunch of templates. Are you a contractor? A coffee shop owner? A graphic designer? Just pick a layout that feels right for your business—it’s a huge time-saver.
The first thing you should always do is add your logo. It’s a small step that makes a huge difference, instantly turning a generic document into your receipt. After that, plug in your business name, address, and phone number. Most good tools will save this info, so you only have to do it once.
Next, Plug in the Sale Details
This is where the magic really happens. Instead of wrestling with a calculator, you just fill in the blanks:
- Line Items: Add each service or product. A quick description, the quantity, and the price. Done.
- Automatic Math: As you add items, the subtotal calculates itself. No more fat-finger errors on the calculator.
- Taxes & Discounts: Need to add sales tax? Or maybe you gave a 10% discount? Just type in the number. The grand total adjusts instantly.
- Payment Method: A simple dropdown lets you mark how they paid—cash, card, check, etc. It’s all right there.
This whole process is designed to get rid of the annoying, time-consuming parts of making a receipt. You can see the evolution from old-school methods to this streamlined approach below.
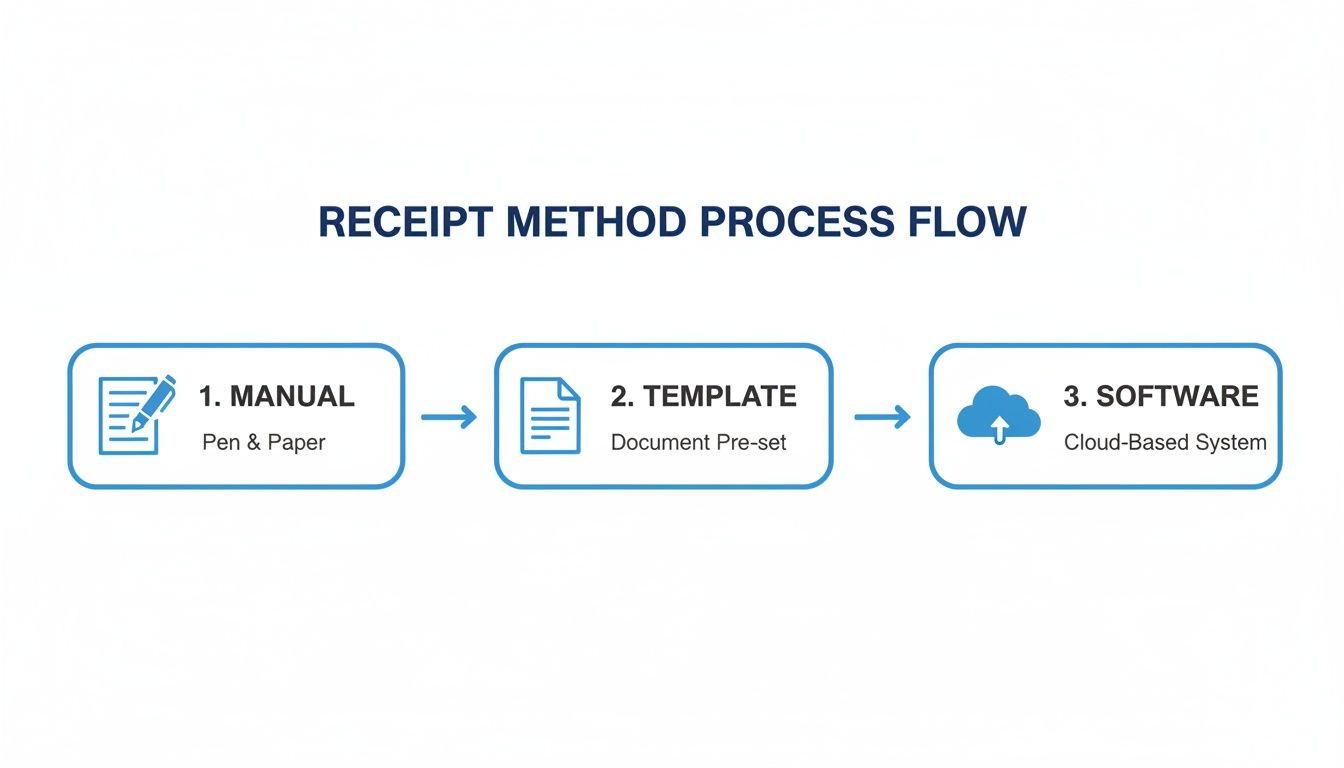
That jump from pen and paper to a dedicated tool isn't just about convenience; it's about looking professional and staying organized.
Finally, Hit Download and You're Done
Once everything's entered, give it a quick once-over. You’ll have a clean, professional receipt ready to go. From there, you just download it as a PDF to email to your client or print out a copy. Seriously, the whole thing can take less than 60 seconds. Want to see for yourself? Try making a Generic Business Receipt right now.
A dedicated generator isn't just a shortcut. It's about consistency. Every single receipt you create will have the same professional branding, the correct legal details, and zero calculation mistakes that can make you look sloppy and mess up your books.
This shift to digital isn't just a small trend. The market for cloud-based receipt management is expected to hit a massive USD 11.36 billion by 2034. Why? Because manual errors pop up in roughly 25% of small business expense claims. Using the right tool drastically cuts down on those costly mistakes and keeps your records audit-proof.
Finalizing and Delivering Your Receipt Professionally
You’ve created the perfect receipt—great! But the job isn't quite done. How you package and send that receipt is the final, crucial step that cements your professionalism and ensures your client has a clean, usable record of their payment.
Before you even think about hitting "send" or "print," give it one last look. A quick proofread now can save you a major headache later. Is the receipt number unique? Are the dates correct? Is the client's name spelled right? These little details really do matter, both for your records and theirs.
Choosing Your Delivery Method
Once you're confident the receipt is 100% accurate, you need to get it into your customer's hands. The right method usually comes down to your type of business and what your client expects.
Here are the most common ways to do it:
- Emailing a PDF: This is the gold standard for most businesses today. It’s fast, gives you an immediate digital paper trail, and it's simple for everyone to file away. Using a PDF format is key because it locks the document, preventing any accidental or intentional changes.
- Printing a Physical Copy: For any in-person transaction—think retail shops, a coffee stand, or a service call at someone's home—a physical, printed receipt is often the expectation. It's instant proof of purchase right on the spot.
- Sending via Messaging App: In some more casual situations, snapping a picture of the receipt and sending it via text or a messaging app can work. I’d use this one carefully, though. It’s best for smaller transactions and only when you know the client is okay with it.
The move to digital receipts is no surprise, especially when you look at how we pay for things now. Cash is taking a backseat as digital wallets and direct bank transfers now account for 30% of point-of-sale volume worldwide. When customers pay digitally, they expect a digital receipt to match. If you're interested in the data, McKinsey’s report on the global payments landscape is a fascinating read.
Crafting the Perfect Delivery Email
If you're emailing a receipt, please don't just attach the file to a blank email. A short, professional note is a simple touch that goes a long way in making a customer feel valued. It doesn't have to be a novel, just clear and courteous.
Something simple and effective like this works perfectly:
Subject: Your Receipt from [Your Business Name]
Hi [Client Name],
Thanks so much for your recent payment. I’ve attached your receipt for your records.
We really appreciate your business and look forward to seeing you again.
All the best,
[Your Name] [Your Business Name]
This little note does three things at once: confirms the payment, delivers the document, and leaves things on a friendly, positive note.
And finally, always save a copy for yourself. Think of your digital files as your financial archive. Keeping everything organized is absolutely critical for painless bookkeeping, tax time, and quickly pulling up a record if a client ever has a question down the road. If you're curious, we have a whole guide on why keeping copies of your receipts is so crucial.
Common Mistakes to Avoid When Making Receipts
A receipt might seem like a simple piece of paper, but getting it wrong can cause some serious headaches. I've seen small mistakes turn into massive problems, from delayed payments and accounting messes to a loss of client trust. Learning how to create a solid receipt for payment is really about knowing which common traps to sidestep.

The single most common error? Forgetting a unique receipt number. Seriously, try finding a specific payment from months ago without one. It's a nightmare. A simple sequential system like #1001, #1002 makes every sale distinct and easy to look up, saving you and your customer a ton of frustration down the line.
Another classic mistake is being too vague with descriptions. Just putting "Consulting Services" on a line item doesn't cut it. I know a freelancer who had a client's reimbursement claim rejected flat-out because the receipt didn't have a detailed breakdown of the work she actually did.
Overlooking Critical Financial Details
Nothing sinks a receipt faster than bad math. When you’re adding up items, calculating sales tax, and applying discounts by hand, it’s just too easy to make a mistake. A single typo could mean you overcharge a customer or, even worse, shortchange yourself. This is exactly why using a tool that handles the math for you is a game-changer.
Beyond the calculations, you have to be crystal clear about the payment details. It’s surprising how often these essentials get missed:
- Missing Payment Method: Was it cash, credit card, or a bank transfer? Leaving this out makes reconciling your bank statements so much harder than it needs to be.
- Ignoring Tax Details: If you're charging tax, you absolutely must list it as a separate line item. Folding it into the total is a major red flag for any bookkeeper or accountant.
- Inconsistent Formatting: When every receipt looks different, it makes your business look disorganized. Sticking to a consistent, professional template builds your brand and helps clients process your documents more easily.
Think of it this way: a good receipt leaves no room for questions. A total stranger should be able to look at it and understand the entire transaction—from the date to the final dollar amount—without a single moment of confusion.
By sidestepping these common blunders, every receipt you send out becomes a clear, professional, and accurate record. It’s a small detail, but it’s a powerful step toward building a trustworthy and efficient business.
Frequently Asked Questions
Even with a solid guide, a few specific questions always pop up. Let's dig into some of the most common ones I hear from business owners.
Do I Legally Have to Provide a Receipt?
This is a big one. While the specific laws change based on where you are and what you sell, my advice is always the same: provide a receipt for every single transaction. No exceptions.
Think of it as non-negotiable. For your customer, it's their proof of purchase. For you, it's a critical piece of the puzzle for bookkeeping, tax time, and heading off any "I already paid!" disputes down the road. Especially in B2B sales, your client absolutely needs that receipt for their own records. It's just good business.
What Is the Difference Between a Receipt and an Invoice?
It's easy to mix these two up, but they play completely different roles. An invoice is a request for payment. You send it before you get paid, outlining what’s owed.
A receipt, however, is a confirmation of payment. You issue it after the money has hit your account. It’s the official "we're all settled" document. Understanding the key differences between an invoice and a receipt is fundamental to keeping your financial records clean and accurate.
Here's a simple way to remember it: An invoice asks for the money. A receipt acknowledges the money. One opens the transaction, the other closes it.
Can a Simple Email Work as a Receipt?
Technically, yes, but I strongly advise against it. A quick "Got your payment, thanks!" email might feel efficient, but it's a nightmare for proper record-keeping.
A simple email often misses crucial details like a unique receipt number, a clear breakdown of charges, and tax details. Using a proper template or a dedicated tool ensures you create a professional PDF with all the necessary information. It looks better, and it’s what you and your client need for accounting.
Ready to create flawless receipts in seconds? With ReceiptGen, you can choose from professional templates, add your logo, and generate accurate, branded receipts instantly. Stop wasting time and start making receipts the easy way. Try ReceiptGen for free today!